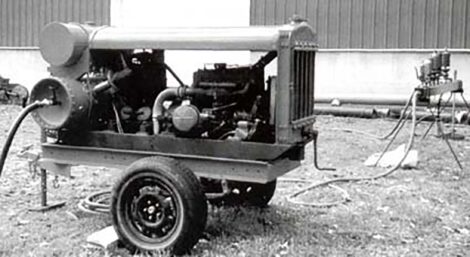
Brian Ferrence poses with his 1927 Ingersoll-Rand compressor shortly after purchase in the summer of 2000 and upon getting the unit home. Power comes from an inline Waukesha four-cylinder engine, which remarkably needed only minor work to get fully operational.
In the summer of 2000, while visiting Harry’s Old Engine page on the Internet and checking out the classifieds, I came across an ad for an old portable Ingersoll-Rand air compressor. It was listed as a 1927 Model, and the pictures made it look every bit that old. The compressor caught my eye because I had been toying with the idea of buying a used, portable compressor to provide air for sand blasting and blowing steam whistles. The
little shop compressor I had couldn’t supply the air volume to do these things, and I’ll admit that the prospect of using an antique unit had a certain appeal.
Unfortunately, the compressor was located in northern Connecticut, a six-hour drive from my home in eastern Pennsylvania. Even so, I gave the owner a call and asked about the condition of the compressor. It sounded like it was worth checking out, but I was still unwilling to drive that far for just a look. It turned out, however, that my daughter, a student at Boston University, would be heading back to Boston for the fall semester in a few
weeks, so I told the owner I would call before taking my daughter back to college, and if the compressor was still available I would stop to take a look.

About a week before my trip to Boston I called again, and the owner still had the compressor. He gave me directions to his home, which was only a few miles off my route, and we arranged a time to meet. He promised to see if he could get the unit running before I arrived.
The finished unit, mounted on a new frame with uprated spindles and wheels so it can be safely towed on the road. Brian used one set of the original leaf springs. Note the manifold of steam whistles, just visible to the right.
And indeed he did, for when I arrived he started the engine, running it briefly while I checked out the compressor. It didn’t run very well – the choke had to be mostly closed for it to run, it seemed to be firing on only two cylinders and it couldn’t power the compressor. But it ran!
During my visit, Frank (I never got his last name) told me the compressor had belonged to a contractor in the area who used it for a number of years in the course of his business. But when the contractor retired, so did his machinery, and the compressor was parked in a field with some other equipment where it deteriorated for a few decades until Frank came across it.
At the time, he and a friend were restoring an old fire truck and had some heavy-duty sand blasting to do. When Frank got the compressor it was seized, and removing the head he found the problem was with the valves. He freed the valves from their bores, lapped them to get a good seal and got the machine running well enough to power the sand blaster.
This illustration, from an original Ingersoll-Rand operating manual, shows a similar, but larger Model IR compressor on original trucks. While the engine shown here is obviously of different manufacture than the one powering Brian’s unit, close examination shows the actual compressor to be almost identical in appearance. Note also the fuel and compressor tanks, which are identical to those on Brian’s finished unit.
There were other problems, too. The engine’s governor was broken and the cutout system on the compressor didn’t work. This meant someone had to stay with the compressor and monitor it whenever they wanted to use it. Frank also found that the cooling system was clogged, so he simply added an additional radiator and let cooling water overflow from the clogged old radiator when he ran it. The gas tank was full of crud, so he hung a gas can on the side of the unit with a rubber hose leading to the carburetor. Crude, but it got the job done. Frank had also set the unit on a great, old steel-wheeled cart. It was not original to the compressor, but sure made moving it a lot easier.
Well, I stopped on my return trip and Frank had gotten the compressor loosened up so I could see it wasn’t rusted fast. We closed a deal, and a few weeks later I returned with my trailer and hauled the ancient thing back to Pennsylvania. It was quite a sight in my side yard – sitting there under a tarp, people mistook it for a covered wagon.
Before I started making any repairs I made a few calls to Ingersoll-Rand to see if they had any old manuals for the unit. I was directed to a number of divisions at three or four different plants in a few different states, but everyone I spoke with was helpful and seemed fascinated by my project. I was finally connected with Diane Dickens at a plant in North Carolina, and she was able to track down some information for me.
She found an old manual and parts book of similar vintage to my unit, and she sent photocopies to me without charge. She also discovered they had a similar unit in their museum that had been professionally restored. When I asked if they ran their unit often she said, ‘Oh my, no, it doesn’t run. It’s just restored cosmetically for showing in the museum.’ She was quite surprised that I intended to restore my machine to working condition and actually put it to work. The manuals were a big help in the restoration and I would like to thank Diane and all the people at Ingersoll-Rand who were so helpful.
Getting to Work
The first thing I attacked was the cooling system. I stripped off the extra radiator and plumbing and removed the original radiator. The good news was I was able to remove about 20 of the old, rusted bolts that hold the cores in place and keep the tanks and canopy together. The bad news was that about 15 were so seized they snapped off when I tried to remove them. It took two evenings of drilling, chiseling and re-tapping to remove the rest and true the threads.
The cores went to the local radiator shop for evaluation, and the shop foreman called a few days later to tell me that two of the five cores leaked. That didn’t seem too bad, but then he told me that the other three were so clogged nothing could pass through them. I bit the bullet and gave the go-ahead to replace the cores. Fortunately, the brass tanks at top and bottom of each core were serviceable, and a few weeks later I picked them up and put my
wallet on life support.
Next, I pulled the head and water intake from the side of the block. I removed about 40 hickory nuts and a few cups full of rust from the system. Then I cleaned the rust from the water jacket of the compressor and checked the water pump at the back of the unit. I’m sure some rust remains in side channels in the block, but my efforts really improved the water circulation. After having the mounting faces on the cast iron radiator tanks milled smooth at a local machine shop, I was ready to reassemble the cooling system.
With that done, I turned my attention to the fuel tank, and after removing about 20 pounds of crud from the tank it was ready for sand blasting. The stream of sand reduced the tank to beautiful lace work, so off I went to the sheet metal shop to have a new tank and canopy fabricated. It was not quite as expensive as the radiator repair, but it certainly added to the mounting expense list.
The engine ran, although poorly, so I checked the timing on the old four-cylinder Waukesha and found it was off by a few degrees when the magneto impulse cutout. Getting the timing set properly allowed the engine to run with the choke wide open, and it also solved a plug-fouling problem. The governor’s problem was that the bearing, which rides on the throttle lever, was gone. I didn’t even know what it looked like, but replaced it with a
slide-thrust bearing race. It seems to work, and – so far – has not self-destructed. I would really like a replacement governor as a backup, and if anyone out there happens to have an extra one for an old Waukesha engine of late 1920s vintage, I’d love to hear from you.
The pressure-regulated speed controller looked pretty rough, but fortunately it cleaned up nicely. Pulling it apart I discovered the piston and cylinder sleeve were brass and in great condition. I got a leather cup of the correct size at a swap meet from a guy with NOS (new old stock) water pump parts. After soaking the cup in Neat’s-foot oil and reassembling the controller, it worked perfectly.
The cutout valves on the compressor’s intake valves also needed replacing, but the leather cups required were only an inch in diameter and I couldn’t find any that small. After contemplating the problem for a while I called a local auto parts store and found they had neoprene cups for brake cylinders one-inch in size. I picked up a few and drilled them to bolt on to the small pistons. So far they have worked fine, and I occasionally add a few drops of brake fluid to the cutout cylinders to lubricate them.
A trip to the auto junkyard produced a set of wheel spindles and wheels from a Dodge Caravan to use on the cart. Front-wheel-drive Chrysler products still use bolt-on spindles for the rear axle, and these are great for building a road-worthy trailer. Another trip to the scrap metal outfit produced channel iron to frame the cart I had in mind. For the suspension I used one set of leaf springs from the old steel wheeled cart. Once the trailer was complete, it was time to reassemble and mount everything back in place.
There were quite a few other small headaches: gaskets to cut, an exhaust to fabricate, air valves and fittings to track down, painting and endless adjustments. But one by one I resolved them until it was time to put the unit back into service.

Finally Working
After a few trial runs I was feeling confident about the operation of the unit. It would come up to 100 pounds of pressure in about 40 seconds and cutout and hold the pressure very nicely. About the time I started to feel good about completing the project, I noticed water gushing from the packing around the air compressor crankshaft! It was quite a challenge to pull the head and replace the blown head gasket without major disassembly, but I managed to get it done.
By August 2001 the unit was finally ready for service. It was put to work at the local fairgrounds, providing the necessary air volume to start our club’s 40hp Bessemer engine, and also powering a steam whistle manifold during fair week and during our club’s fall engine and tractor show.
This wasn’t an easy project, but, as always, it was rewarding and I learned a lot in the process. I would love to hear from anyone else who has a similar unit or who needs help in a restoration.
Contact engine enthusiast Brian C. Ferrence at: Box 78, Summit Station, PA 17979, (570) 754-7249, or e-mail: Bferenc@hotmail.com
‘After a few trial runs I was feeling confident about the operation of the unit. It would come up to 100 pounds of pressure in about 40 seconds and cutout and hold the pressure very nicely.’


