
There have been at least two magnet charger papers in Gas Engine Magazine over the years. The first, which I consider to be the gold standard charger, was Building a Heavy Duty Magneto Charger by John Rex. The second being Build Your Own Magneto Charger by Peter Rooke. Both of these are major projects to build, especially the Rooke unit, requiring a lathe for metal working and coil winding. They weigh in the neighborhood of 150 pounds and are large and difficult to move. And to build them is expensive, as the copper wire required costs several hundred dollars.
This paper uses new rare earth magnet technology to build a bare bones charger that is stronger than the Rex and Rooke chargers, can be built in 5 minutes, costs less than $40 to build, measures 2-1/2-by-12-inches, and weighs less than 5 pounds. In summary, it works well, is easy to build, and is inexpensive and portable.
As the magnets in old magnetos age, they slowly lose magnetic field strength resulting in less spark energy. Age as well as excessive heat, radiation, strong external magnetic fields, and shock cause some of the millions of tiny magnetic domains to become misoriented and unable to contribute to the desired field. A brief discussion of these magnetic domains can be found in Build your Own Magneto Charger by Peter Rooke.
A recharge is the usual fix for a weak magnet. A properly oriented, strong magnetic field is passed through the magnet. This strong field puts torque on the misaligned domains, causing them to realign. Once realigned, they contribute again to the overall magnetic field. The usual source of the strong magnetic field used to recharge the magnet is a pair of large electromagnets (see Figure 1).

Although the usual source of the strong re-magnetizing field is two large electromagnets, any strong magnetic field will work. A Star Wars magnetic propulsion system may come to mind, but rare earth neodymium super magnets are much easier to come by and work well for recharging a decayed magnet. Magnets seem to be ancient and mundane technology but, a few short years ago, efficient D.C. electric motors such as those in electric cars and drones drove magnet technology beyond what was imaginable.
Strong rare earth magnets are now readably available in all manner of sizes and shapes at reasonable prices. For example, it is not difficult to find 2-inch square magnets that require more than 100 pounds of force to pull off a sheet of steel, making them stronger than the best homemade magnet charger. They do not lose strength over time. Figure 2 replaces the large electromagnets in a charger with strong rare earth magnets.

To recharge horseshoe magnets, a pair of BYO88-N52 magnets were purchased from K&J Magnetics for $17.88 each. These magnets measure 2 by 1/2 by 1/2-inch and require over 67 pounds of force to pull them off a 3/8-inch thick sheet of steel. The two magnets were placed on a 3/8-inch thick by 2-1/2-inch wide by 12-inch long sheet of cold rolled steel, one magnet with the north pole up and the other with the south pole up. A word of caution here, these magnets are extremely strong and brittle. They will jump out of your hand and hit the steel bar with great force and can easily shatter. Figure 3 is an unfortunate $17.88 loss.

The magnets will arrive stacked with a plastic spacer between each, as shown in Figure 4. Mark the top of the stack red and the bottom black. When the magnets are properly placed on the steel bar, the red and black marks will both point up. The best way to keep them from jumping out of your hand is to approach the steel bar from the side with the red mark up and slide the magnet on, followed by the other magnet, black mark up.

As unbelievable as it may seem, Figure 5 is a complete bare bones magnet charger.

The process of recharging is straightforward. First slide the two rare earth magnets together, or apart, to fit the magnet to be charged. Expect to find that task a bit difficult as the magnets cling to the steel tie bar with a force greater than 67 pounds. The magnet to be charged is then suspended over the charger on a string. The magnet will rotate so that its south pole is over the charger north pole. When oriented, set the magnet down on the super magnets (see Figure 6). Another warning: To control placing the magnet, approach the charger with the magnet from the side. Beforehand, clamp the charger to a sturdy bench, otherwise the charger will leap up and attach to the magnet.

It is common to use a compass to determine the north and south poles of the charger and magnet to be charged, however these super strong rare earth magnets will re-magnetize a compass if it gets too close. The author now has several compasses that point south; it seems better to suspend the magnet on a string.
The charger has the advantage of not consuming power and can therefore be left charging a magnet for hours or days, if desired, rather than seconds on an electromagnet charger. However, data suggests that 80 percent of the charging gain is achieved in 30 seconds and 100 percent is achieved in 2 minutes. A side note here: The author has measured several chargers and, although many claim 20 to 30 seconds of cumulated charge time is sufficient, all measured chargers deliver a stronger magnet when left on for two minutes. The bare bones charger has no ON/OFF switch, which makes it difficult to remove the magnet from the charger. The best way to get the magnet off the charger is to push on the side of the magnet until it tips, then pull upward (see Figure 7, top).
Several uncharged magnets were tested before and after being recharged. Their magnetic field was first measured with a Tesla meter gapped at 0.050-inch. The Tesla meter gives the actual, true, no guessing, magnetic field strength. Each magnet was then placed on a magneto; the magneto’s energy output was measured at 50 and 400rpm. The test results were compared, pre- and post-recharge. The $40 bare bones charger showed excellent results. There was substantial increase in the magnet’s field strength as well as the magneto output energy after recharging.
The horseshoe magnets were recharged out of the magneto. Common folk lore and wives’ tales warn not to remove a magnet from the magneto. As loudly as this is proclaimed, this warning is incorrect. Several studies have measured magnet strength over time and found no degradation when removed from the magneto without a keeper. A keeper is a steel bar placed across the magnet poles. One study left magnets without keepers laying on a wood bench for 18 weeks, and no degradation was measured. Both horseshoe and bar magnets may be removed from the magneto for hours or days without damaging their strength.
How well does the $40 bare bones magnet charger perform? This is evaluated by the strength the charger’s magnetic field imposes on the magnet being charged. In the early days, only engineering laboratories had the capability of measuring magnetic field strength directly. The strength of most electromagnets was estimated by measuring their Amp turns. The theory being more coil wire turns and more Amperes in those turns will increase the magnetic strength. This is a relative measurement, and it fails to consider core size, material, unintended air gaps, and a host of other items. It is like assuming a 427ci car engine is more powerful than a 396ci engine while not knowing the compression ratios or valve and ignition timing. But technology marches on. Today accurate Tesla meters can directly measure the magnetic field strength and can be purchased for less than $100. It is now a simple matter of measuring the magnetic field strength across a standard gap. The gold standard for home-built chargers is the John Rex model described in Gas Engine Magazine, January 1989. Figure 8 is Redd Stanberry’s charger built to Rex’s specifications, which produced a 733mT (0.733 Tesla) field.

The author has measured other homebuilt chargers less beefy than the Rex unit but, in turn, more portable. Those that proved to adequately recharge magnets produced fields in the range of 500mT to 600mT.
The bare bones rare earth charger, as shown in Figures 5, 6 and 7, produced a field of 1110mT (1.11 Tesla), easily outperforming every homebuilt charger that the author has measured over the years. It does not outperform the commercial Weidenhoff Model 818 charger shown in Figure 9, featured in Gas Engine Magazine August/September 2020. The Weidenhoff produced 1600mT (1.6 Tesla), weighs 500 pounds, and runs on 120V mains. Most recharged horseshoe magnets will fall in the range of 150mT to 200mT under the same test conditions.

If more than horseshoe magnets need to be recharged, the basic configuration of Figure 5 can be modified to a more universal form as in Figure 10. This configuration is identical to normal electromagnet chargers. The rare earth magnets do not need to be moved to accommodate different sized magnets, and pole pieces can be used when charging non-horseshoe magnets or magnetos.

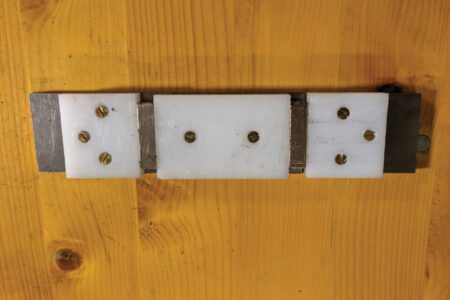
In order to planarize and level the deck, the author used some plastic he had laying around the workshop (see Figure 11). Any non-magnetic material can be used, but avoid aluminum. Aluminum is generally non-magnetic, but, in high fields, becomes slightly magnetic.

As shown in Figure 12, the pole pieces can be moved to accommodate other magnets and magnetos. Although the planarizing material can be any non-magnetic material, its height must be machined accurately as any air gap between the magnet and the movable pole piece will rapidly degrade performance.

Figure 13 is a completed subassembly. This assembly used the same size tie bar as in the bare bones charger, 3/8 by 2-1/2 by 12 inches. The plastic planarizing pieces are held in place with non-magnetic brass screws; epoxy would likely work as well.
The two cold rolled steel pole pieces, sized differently to indicate the versatility, are added to finish the charger (see Figure 14). Figure 15 includes other pole pieces to accommodate a Wico EK.


Dr. David Cave is a regular contributor to Gas Engine Magazine and can be reached at jdengines@cox.net.


