When I was a kid back in the ’50s, from time to time I’d help a local farmer. In fact, I’d help any farmer who’d let me on his tractor. One particular farmer had two late model John Deere Bs and a brand new G. I’d happily give up girls on Saturday night in favor of running one of those Bs in the Illinois River bottoms.
I never forgot how easy it was to run those little tractors, and how versatile they were. Each was equipped with a mounted cultivator, pulled a two-bottom plow, a three section harrow and a four row planter. In the winter we mounted a buzz rig on the front of one of them and cut wood. The Power-Trol hydraulic system seemed like magic to me.
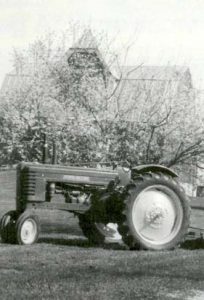
One day in the spring of 1996 I noticed two Bs for sale on a local sale bill. One, a 1936, was partially restored. The other, a 1945, was listed as “rough but running.” The next day I was the proud owner of “Old Rough but Running.”
A couple of weeks after the sale, I called a neighbor and he agreed to haul it home for me. The day of the sale, it started right up so I thought, no problem. Wrong! When we got there the battery was dead and no one was home. So we dug out a chain, I switched the fuel selector to “G,” we pulled it and it started and ran about two minutes. We hooked up the chain and pulled it again. Same drill. I looked into the little tank and I could see gas. What I couldn’t see was about an inch of crud in the bottom of the tank. Finally, I sniffed gasoline in the main tank, switched it to “F,” we pulled it the third time, it started, we loaded it and hauled it home.
I charged the battery, filled the tractor with gas and for the rest of the summer I used it to rake hay. But there were some mysterious sounds from deep inside and, boy, did she smoke! By the end of the summer I had decided to ‘fix it.’ I had no idea what I was getting into.
During the winter I ran into Don Zenk who lives just south of me. Don is something of a local legend when it comes to tractors and engines. Only problem is that he has this Ford fixation. Green and yellow makes him surly, but he got over that, and finally one day in January when the sun was shining, he called and said, “This would be a pretty good day to bring that darned thing over to the shop.” It took me ten minutes to get it started and in his driveway!
Don’s shop would make a tractor restorer’s mouth water, welders, a lathe, drill presses, paint sprayers, bench grinders, impact wrenches, parts washers, a billion tools, sanders, overhead hoists, parts bins, bolts, nuts, washers, a thumping wood stove, music and tasteful bathing beauty calendars. I wanted to move in.
“You might as well start taking that thing apart,” were his first words. “How long do you think it’ll take you to overhaul it?” I asked. “I ain’t go on a overhaul it, you are,” he said. And from that day on, he and his wife Millie referred to me as “the student.” To make matters worse, that’s how he introduced me to his customers.
The taking-it-apart phase got a little out of hand. It seemed that everyone who came in or hung around the place wanted a piece of the action. A couple of guys just grabbed impact wrenches and started in. Others would walk in, watch me struggling and say, “Need a hand with that?” Next thing I’d hear was ‘zip’ and another hunk would hit a box.
End result: Lots of boxes full of parts whose origins would later turn out to be a mystery to me. That brings me to technical tip number one: When people offer to help tear your tractor to pieces, gently but firmly decline their offer. If they persist, whack ’em on the head with a nice clean breaker bar, drag’ em out to the wood pile and call 911. No local judge will convict you.
When I finally got the boxes full, I did a kind of inventory and assessment. Here’s what I discovered:
1. The radiator was in bad shape. I figured out that this had something to do with the fact that I couldn’t keep water in it.
2. Some of the rings were stuck and the cylinders were kind of egg-shaped. This was probably what caused the tractor to look like it was burning corn cobs.
3. Gear on the end of the fan shaft was worn so thin you could shave with it.
4. Packing was gone out of the fuel selector valve.
5. Magneto had been messed up by some wannabe Thomas Edison who had converted it to battery ignition.
6. Drawbar had been cut in two and rewelded and was put in backwards.
7. Clutch was bad.
8. The clutch brake shaft was worn and the casting it fit into was egg-shaped.
9. Shock absorber on the seat had been welded together. (No wonder it rode a little rough.)
10. The full fenders were rusted through at the bottom near the mounting brackets and badly pitted overall.
12. Rocker arms were not centering on the valves so someone had made some spacers out of baling wire wrapped around the rocker arm shaft. (It worked!)
13. Both turning brakes were shot.
14. Lights were long gone.
15. It had at least three coats of paint of various shades of green.
16.Bearings in the front wheels came apart in the parts washer.
17.Some shade-tree mechanic had split the hood and peeled it back like a tin can so he could replace the muffler without removing the hood.
Now, the good stuff:
1. It had oversize high compression 0.025 oversize pistons in it and they were okay. But since the cylinders were worn, we had to make a decision. Do we keep the pistons and find another block to re bore? Do we junk the pistons, bore the old block again and install new pistons and rings? Do we junk the whole works and open a coffee house? We decided to find another block, bore it to fit the pistons, and install new rings.
Here’s technical tip number two: I discovered that old pistons just don’t slide right out of their sockets. The rings stick at the top of the cylinder. You can’t get into the transmission case and whack the rods with a hammer. What to do? Take about an 8′ -10’piece of two-by-four, split it down the middle and carefully wedge it between the crank and the rod then rock the crank with the flywheel. But unless you have more fingers than you need, keep ’em in the clear.
2. Valves, valve seats and guides were pretty good. Cleanup, reseating and grinding did the trick. (Yes, Don also has a valve-grinding machine.)
3. Gears were fine. Amazing, isn’t it? Fifty-three years old, not badly worn, and still turning.
4. There were no cracks in the head.
5. Crankshaft wear was tolerable.
6. Tires and wheels were in nearly new condition.
Some friendly advice: Buy some new music tapes for your pickup truck, get yourself organized, and take a geography lesson. My nearest John Deere dealer is 22 miles north of me. The guys who do block reboring are 25 miles west of me. The sand-blaster is 32 miles south of me. The nearest John Deere bone yard (‘old Dave’) is 35 miles northeast of me. I figure I drove over 300 miles and wore out a Lyle Lovett tape just chasing parts and pieces.
While the machinists were boring the block and resizing the pulley brake shaft, I went to work on the sheet metal. We cogitated about the hood. I was for throwing it away. Don was not. I walked in one day and it was lying on the floor looking very much like new. (He also has a set of body shop tools.) Amazing what a good welder with a gallon can of Bondo can do. I loaded the fenders in my truck and visited a couple of body shops. Don’t do that. You’ll faint when they quote prices. Body shop guys today are like doctors. They’ve been paid too long by insurance companies. One guy even said ‘throw ’em away.’ I took ’em back to Don and (you guessed it) out came the welder, the Bondo, and the sander, and the fenders were saved.
The smaller sheet metal parts I took home to my shop. After wearing out a small sander, I decided to try paint remover. It works. The screens on the grill had some holes in them so I made my second visit to old Dave. You can buy replacement screens or just the screen material. I opted for the latter, removed the damaged stuff, cut the new screen with the tin snips and popped it in place. Worked great. I beat out all the dings I could, hauled the whole mess to the sandblaster, and when I got it back it was primed and ready to paint.
A note about paint: Don told me to pick up two gallons of green and one gallon of yellow. On one of my visits to Old Dave, I spotted a bargain his ‘house’ brand. I decided that since my tractor wasn’t really very big, one gallon of green would do. I bought it, hopped in the truck and went back to the shop, feeling pretty good that I had saved some money.
“Wanna know something about that paint?” Don asked. “It’s crap. Take it back and do like I told you. Get John Deere paint, two gallons of green, one gallon of yellow.” I did.
Cleaning all of the grease and dirt off a tractor in the middle of winter when you can’t fire up a steam cleaner is a task. I used scrapers, a hand wire brush, a Makita power wire brush, a pocket knife, a dental pic, and in one case, a chisel. When I thought I was done, Don said, ‘Nope, you got to get all that oil off or the paint won’t stick. ‘Thinking I’d be a good guy, I bought a can of Gunk de-greaser. ‘Throw that away,’ he said ‘use this’ and he handed me a can of carburetor cleaner. It works, folks! It washes off the oil and leaves the surface clean and dry.
Technical tip number three: If you do this, open the doors and turn on the fan unless you’re ready to see God. The stuff is nasty!
The main fuel tank was clean and looked okay. However, the small gas tank was rusted inside. I put a couple of feet of chain inside the tank, shook it around for several minutes, then blew out the junk. I decided to try a tank sealer I had seen advertised in Two-Cylinder Magazine. I used the recommended ‘etcher,’ dumped it out and dried the tank, then poured in the prescribed amount of sealer and set it up to dry. It didn’t. So I propped it on top of the wood stove. Result: the heat from the stove melted the solder around the filler neck and it fell out. After re-soldering the filler neck, we let it finish drying naturally. Neither of us was impressed with the sealer but the poor results were probably my fault.
In late March we were ready to start painting. By this time, “Old Rough But Running” was perched on jack stands and starting to look like a tractor again. I’d given everything a coat of primer and sanded until my arms ached. Don fired up the sprayer and “voila!” it was green again. Technical tip on painting: If the stuff you’re painting ain’t clean, the paint won’t stick. It will do mysterious things like wrinkle up and stay gooey.
I wound up resending lots of wrinkled spots or spots where the paint left little ‘eyes’ where the metal showed through, even though I thought everything was clean. I finally concluded that the wire brush I used had oil on it from cleaning other parts. The parts that didn’t paint likely had a thin coat of grease applied by the brush itself.
When the paint had dried, the reassembly process began. On April 8, Don said ‘I’m gonna take a nap, so put in the drain plugs, and fill it with oil and water.’ Oil filling went well. Water did not. It dripped out the bottom of the engine. A gasket? Nope. A pinhole in the block. I almost bawled.
When the machinists bored the block, they also dumped it in an acid tank to clean it. The acid took out interior rust, and the pinhole developed. Fortunately, it was in the bottom of the block in a spot where it could be repaired with some ‘blue poop’ sealer and a little ingenuity. Since the cooling system is not a pressure system, the repair will probably hold but I was disappointed.
And that brings me to Technical tip number 5: When you buy parts at a junkyard, you may get junk.
I should have asked the guys who sold me the block to pressure test it. That might have turned up the leak. Maybe not. Next time, I’ll pressure test blocks and heads before I reassemble. If that leak had been under the frame we would have had to tear down Old Rough and Running again and that would have been a real bummer.
Putting the tractor back together went pretty well. The Phillips-head screws that hold the sheet metal on were shot so we substituted bolts designed for grain bin assembly, the kind with rubber washers on them. Not for a purist, I know, but they worked. We replaced the clobbered-up mag with one Don had upstairs, and it turned out to be something of a problem that took a while to resolve. Don scrounged up some 6-volt lights. I cleaned and painted them and hooked them up. New wiring all around, a new set of plugs and a little gasoline and ‘bloop, bloop, bloop.’ It was actually running!
Am I totally satisfied? Is it perfect? No, but then I didn’t really want a show tractor. I wanted a restored B that I could use to pull the manure spreader, a bush hog and a hay rake. (Okay, and maybe drive in a parade or antique tractor pull or two.)
Was it expensive? Was it worth it? Well, I’m going to do something I’ve never seen done in a restoration article. I’m going to tell you what I spent and you can be the judge. Here goes:
Tractor purchase price | $1100.00 |
Rings, pins, block, misc. parts | 920.79 |
Sandblasting | 140.00 |
New radiator | 250.00 |
Machine work (rebore, etc.) | 200.00 |
Generator rebuild | 65.00 |
Paint, misc. | 98.46 |
Technical assistance, oil & gas | 250.00 |
Total project cost | $3024.25 |
Total project cost
$3024.25
To me, it seems like a bargain. I have a tractor that was made the year World War II ended, a machine that brings back great memories every time I hear it run, and a very useful addition to our small farm. Andit now cranks out an honest 25 horsepower on the dyno.
Now, if you’ll excuse me, I’ve got to get back to work on an LA that we dug out of a pole barn. Complete with spare engine, mounted plow, lots of rust, missing grill. Rough, but running. . .


