


Copper tubing makes an attractive and permanent oil or fuel line and connections. Here are a few hints that might be helpful in working with copper tubing.
To begin with, new copper tubing is much easier to work with than old tubing. This is because it is softer. Old tubing becomes hard and difficult to bend without kinking. Old tubing can be softened by heating, so it becomes easier to bend. There are various types of tubing benders on the market, but copper tubing can be neatly bent by hand with patience and time.
Tubing connections are easily damaged, but with care they can be removed and replaced many times. When removing a tubing nut, it is recommended that special tubing wrenches be used. For occasional use, a wide jawed crescent wrench is suitable and preferable to an open end wrench or pair of pliers. If a fitting is to be removed from a casting, it is advisable to replace the nut on an inverted flare fitting before attempting to remove the connection or the internal threads will be damaged. On all old engines and castings, one end of the tubing fitting was always a pipe thread. The various types of fittings all had their special thread pitch. Three of the common types, all for 5/16 tubing and all with 1/8 inch pipe thread connections, are shown in the accompanying illustration. There are tubing thread restorers available for both external and internal threads of the type fitting shown in this illustration. There is, however, only a limited use for the tool. To prevent damaged threads, the tubing nuts should be started by hand, with both ends of the tube loose. After several threads have been fastened, the nut may be tightened securely with a wrench.
For a temporary repair, leaking connections may be corrected by removing the nut and wrapping several strands of string or thread under the flare of a flare type fitting, or over the ferrule of a compression fitting, and then replacing the nut securely.
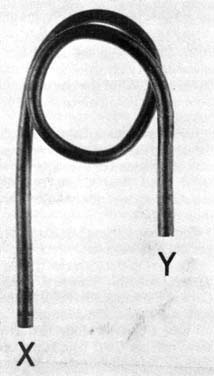
When making a tubing connection where the fittings must be relatively close and the tubing is short or where the two ends are directly in line, it is recommended to place a loop in the tubing. Note the examples in the illustrations. This method will provide flexibility necessary to make good connections without kinking the tubing and restricting the flow.
Compression Fitting
A three piece fitting consisting of: 1. Female thread nut. 2. Ferrule (sleeve). 3. Straight connector (available in elbow connection).
Inverted Flare Fitting
A two piece fitting consisting of: 1. Male thread nut (tubing must be flared). 2. Straight connector (available in elbow connection).
Flare Fitting
A two piece fitting consisting of: 1. Long shank female thread nut (tubing must be flared). 2. Straight connector (available in elbow connection).
There are a number of types of tubing fittings available. Each type of fitting must use only the parts for that type of fitting. Almost all of them use a special thread pitch. Any one of the three types shown may be used to meet your needs. It is mainly a matter of personal preference, where flow, rather than pressure is involved. The inverted flare fitting is probably the most secure and would withstand more abuse and pressure than the other two types. Both the SAE flare and the inverted flare fittings require a special tool to flare the end of the tube. A double flare is highly recommended rather than a single flare on both types. The compression fitting has an advantage over the other fittings in that it requires no special tools to make the connections. The ferrule, or sleeve, is merely pushed on the end of the tube and the nut locks the ferrule to the tube. To obtain a more flexible connection with the same simplicity the compression type fitting is also available with a neoprene sleeve in place of a brass sleeve. This fitting is also quite expensive but does serve greater flexibility of the tubing after installation.


