


The story about my 3 HP Hercules model F kerosene engine begins in March of 1995. At this point of my life I had never seen a one lunger gas engine or even heard the term “one lunger” engine before. By profession I have to be fairly mechanical, because I teach woodworking, metalworking, and occasionally, some small gas engine repair, but I still had no inkling of what a one lunger gas engine was.
One day a conversation came up with my friend and co-worker, Jim Cogan, about the antique truck he was restoring. Jim explained to me that he had some leads on parts, or possibly even some antique trucks in the Baltimore, Maryland, area. Jim asked me if I would like to go with him to “check it out” Saturday. I agreed to go, and bright and early Saturday morning we left for the three-hour drive to Baltimore.
After arriving at the property where the trucks were, Jim and I were looking over the man’s antique trucks when I asked Jim, “What in the world is that thing on the bed that Mack truck?” Jim’s reply was, “That’s a one lunger engine.” Jim and I went and crawled up onto the bed of the truck for a closer look. Pointing out the parts and explaining to me at the same time, Jim went on and on about various uses and the mechanics involved for what he called a one lunger.
At this point I really don’t know what inspired me to ask Jim if this rusted mass of moss-covered iron ever could function properly, or run again. Jim assured me that it is amazing what “a little sandblasting” could do to rusted cast iron. I asked the owner if this engine was for sale. The reply was “No!” but the owner proposed a deal. The deal was that I would restore a different engine in a little bit better shape for him first, then he would give me the engine that I had tried to buy a couple of minutes earlier. Within a few more minutes Jim and I had purchased, or worked out a deal for, a 1925 IH truck, a 1927 Autocar truck, a one lunger engine and the engine, which turned out to be a little home light plant, that I would restore for the one lunger.
On the ride home all Jim and I could do was try to figure out a way for us to get the engines and trucks 200 miles home, especially since neither of us has a trailer or any other type of transportation for items of such size and weight. A couple of sleepless nights followed; all I could think of was, what had I gotten myself into? No way to get the trucks or engines home, let alone what condition the engine, that I had made the deal for, was in.
Later that week I was visiting a relative, Bill Miller, who is in the business of rebuilding heavy equipment. I explained to Bill the bind that I was in for a way to get the trucks and the engines home. As we were talking Bill asked me where in Baltimore the trucks and engines were located. When I told Bill he just smiled and said that he was sending his trucker down to send some equipment to the CAT dealer, which just so happened to be within a couple of miles of where Jim’s trucks and the engines were. Bill said he would just send the driver over and have him pick up the trucks and engines for us. What a relief! I couldn’t get home fast enough to tell my wife, and to call Jim and let him in on the great news.
The trucks and equipment were to be brought up the following Tuesday, and would be at Bill’s shop that afternoon. Tuesday school couldn’t get over fast enough. You know the feeling. Jim and I were like a couple of big kids with new toys just waiting to see and touch them. Finally the 2:45 bell rings and we are on our way to Bill’s shop to see our prizes.
Bill’s trucker couldn’t believe that we were going to really try to “restore” this “junk” as he called it. Boy, he must have felt a little funny on the road that day with two old trucks and “whatever those other things are,” as he called my engine and the little home light plant.
That evening the trucks ended up at Jim’s house. The next day the engines were brought to school. I stored them in my supply room. A lot of comments like “What in the heck are those things?” is what I heard all day long from my students. Each time I explained that these rusted masses were engines, my students’ eyes got a little wider, and there was a lot of staring at the engines. I’m not so sure, with the appearance of the engines, that some of my students really believed me when I explained to them that these were engines. Also I heard a lot of comments like, “That thing will never run again,” or, “Shively’s nuts.” At first glance I wasn’t so sure that I couldn’t agree with some of my students.
The first thing to do was assess the condition of the home light plant, so I could restore it and fulfill my obligation to the owner as we had agreed. Luckily for me it only needed a paint job and some cleaning up. Mechanically it was sound. No parts missing, good compression, and overall very good shape. Within a few weeks I had the light plant painted and in working order. Another trip to Baltimore to deliver the light plant and the deal was complete. Now I was the proud owner of a one lunger.
Before I could start on my engine I had to know what type engine it was. So far, neither Jim nor I had a clue as to what type of engine I had acquired. The only information we had was what the engine tag said. The tag had serial #279770 RPM 475 and HP3FK. That’s all we knew about my engine at this point. Jim had a book he called the “Encyclopedia” of gas engine makes and styles. We looked through the book the next couple of days and determined that I was the proud owner of a Hercules 3 HP, model F, kerosene type engine.
Now that I knew what I had, I assessed the overall condition of the engine. It was covered in moss and heavily rusted (see picture number 1 above).
All the grease caps were removed, and every brass fitting was broken off right in the part it was into. The piston was stuck. The head had a piece missing, and the valve stems were barely recognizable.
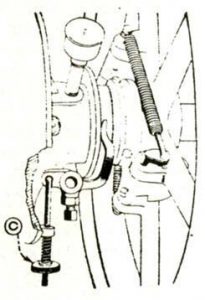
The governor assembly was missing a flyweight, and rusted so badly that determining the different parts was almost impossible. It appeared that the last time the engine had run, the one remaining flyweight was wired so it could not operate properly, therefore the engine was allowed to run wide open. Not a healthy thing for an engine (see picture number 2 in the Image Gallery).
Fuel tank rusted out completely. No magneto, no crankguard, or muffler. Cam and gear were missing, and lastly one unique and rare part, the gas-kerosene mixer. The hopper was about half-full of parts, and some sort of heavy wax-like substance that had solidified over the years. There were some parts sticking in this wax-like substance. Digging through the hopper I found all kinds of things like nuts, bolts, wire, studs and a very important piece. It was the piece that was broken out of the head. What a stroke of luck! Someone years ago had thoughtfully put the broken piece from the head into the hopper. It fit perfectly back into its appropriate spot on the head.
Jim and I figured that the engine had sat under a pine tree for years, and that this wax-like substance was actually pine sap. This idea fit with the other clues we had: engine covered in moss, and pine needles. Under the moss and pine needles was grease mixed with lots of saw shavings. We are assuming that this engine spent its working life in some sort of sawing operation, and when it finally broke down or was no longer needed, it was put under a pine tree to sit, until the person I traded for it acquired it. He stored the engine in the back of an old Mack pickup, which is where I first saw the engine.
Now the fun begins! Tearing the engine apart. Wow, was I surprised. Most all the bolts and nuts that had a head left came off very easily. As rusty as the engine was, I never figured that the nuts and bolts would break free and come apart so easily. The head was the first thing I decided to take off. I figured then I could determine what shape the cylinder was in. The head bolts were loose, which allowed water to get into the cylinder, but the head could not be removed because the pushrod was rusted into its guide. After cutting the push-rod, the head was finally off. An inspection of the cylinder revealed that my worst fears were realized. The cylinder was rusted and pitted badly. I stood the engine up on end and let the cylinder soak in Kroil.
While the cylinder and piston were soaking, Jim and I decided to repair the head. I sat the head on the top of the foundry furnace in our metal shop with crucible cover open, and let the head heat up to a cherry red temperature before the intake valve could be pounded out. The exhaust valve took an additional two heatings before I was able to pound it free. Then I sandblasted the entire head and Jim, being an expert at welding cast iron, veed out the head and broken piece, and using a soft nickel rod with a lot of patience and peening repaired the head.
I took the head to a friend of mine who operates Cresap Automotive Machine Shop, where they put in new valve guides and cut new seats. I purchased new valves and springs from a vendor located in GEM, and my head was now repaired and completed, ready to be primed. After priming, the spot where the piece was welded could not even be determined, even by Jim or me, and we knew where to look for it.
I took the main bearing caps, and the connecting rod cap off and found the crank and connecting rod journals to be very rusty and deeply pitted. I guess that was because the grease cup had been taken off and water was allowed to get into the journals. I removed the flywheels and crankshaft as an assembly.
I was now ready to try to remove the piston. The cylinder and piston had been soaking for about a month. I made a maple disc about 1/16 of an inch in diameter smaller than the bore and about 14 inches thick. With a sixteen pound sledge, some sweat, some breaks to ponder the situation, and sore arms, we had the piston out of the cylinder. The piston was in perfect condition, but the bore was rusted and pitted. I then removed the piston wrist pin, so the piston and connecting rod were apart, and I found that the wrist pin end of the connecting rod was almost rusted off! I would need to find another connecting rod (see picture number 3 in the Image Gallery). I decided that I would have my friend at Cresap Automotive Machine resleeve the cylinder back to original bore size.
The crank also needed some attention, due to the rusted condition of the journals. Pulling the flywheels turned out to be a real experience. I could not find a puller big enough to do the job, so I was back up to Bill Miller’s shop where he happens to have a 50-ton hydraulic gear pulling piece of equipment. We pulled the flywheels with ease on Bill’s puller. Then I took the crank to Cresap Automotive Machine where my friend turned all three journals down 20 thousandths each. This proved to be enough to clean up the crank, leaving only a couple of real small pits.
By the end of the summer of 1995 I had the main parts of my engine, cylinder, crank and flywheels, and the head machined and ready to be used. Flywheels were put back on the crankshaft. Now I could begin the search for the replacement parts that I needed. I placed an ad in the want ads of GEM and hoped for the best. I only received one reply, but as it turned out it was a very important one! A man from Ohio called me one evening. He had the gas-kerosene mixer, complete with the fuel pump body. We agreed on a price and the mixer was mine! I was very excited, because this mixer, as I had found out by this time, was a very scarce part. This mixer is also quite an intricate part, and must work perfectly for the engine to function properly: it has a pump body that is actuated by the push rod’s forward motion on the exhaust stroke, a reservoir to use for gasoline for starting the engine, a needle valve that mixes the fuel air mixture being drawn into the engine, a needle valve that allows the draining of the reservoir, and an overflow feature that keeps the fuel at a constant level. As the engine runs and warms up, the gasoline is used and replaced in the reservoir with kerosene from the fuel tank.
When the mixer arrived by mail, I noticed immediately that it was in very good overall condition, even showing some original paint, but that the needle valve that allows the reservoir to be drained, was broken off completely, which happens to be down inside the bottom of the mixer. This presented a big problem. The needle valve size is 5/16 of an inch, and where the needle valve seats is about 2 inches down inside the mixer. The problem was, how to drill out the broken off piece without messing up the needle’s seat.
Another friend of mine, Ron Paul, had an idea. First he made a little light that was small enough to fit down inside the reservoir area of the mixer, that was bent at a 90 degree angle. Now we could see what we had to do to remove the broken piece. Very, very carefully we drilled out the broken off piece, and to our surprise, the tapered area where the needle actually seats didn’t have threads. When we drilled in approximately a quarter of an inch or so, the tapered part of the needle valve on the original seat just fell out! This meant that the angle for the needle seat in the mixer was not damaged. I made a new needle valve using the little piece that had fallen out to get the right angle for the seat, and now I had a good mixer ready to be used. All the other parts for my engine are the same as a hit and miss, 3 HP engine, so I purchased the remaining necessary parts and springs.
Now I could start the reassembly process. The first thing I needed was a connecting rod bearing. Since my crank is now 20 thousandths undersize, the original bearing insert will not work. I made a dummy shaft, using a metal lathe, the size of my crank journal, and fabricated some wooden jigs, using a wood lathe, to give me the proper shape I needed for a new bearing (see picture number 4 in the Image Gallery).
I obtained some babbitt. After heating the dummy shaft up a couple of hundred degrees, I poured the connecting rod bearing. It went surprisingly well. On the first attempt I had made a perfect bearing insert. I put the piston and connecting rod together and installed them in the cylinder. This allowed me to get the proper gear fit between the cam gear and crankshaft gear. Now I made some more jigs to allow me to pour my crankshaft bearings. Again, I preheated the crank journals and poured the bearings. As before, I had no problems and had a good set of bearings that fit my crankshaft perfectly.
At this point I had all the parts I needed to complete the restoration, so I had the proper color paint mixed. I sandblasted, primed and painted every part separately. I figured that then, when I reassembled the various parts, I wouldn’t be splattering paint in the wrong spots. I started the reassembly process. Little by little the engine started to take shape. It would turn over and actually started to look more and more like it really was a “one lunger” gas engine. Finally! It was all back together except for one little unique piece that was only used on this type of Hercules kerosene engine. There is a small valve in the head that, as the engine runs on kerosene, can be used to mix a small amount of water from the hopper into the mixture being drawn into the engine. This feature takes the knock out of a kerosene type engine.
I tried calling every used parts supplier that I could locate in GEM, but none of them had this little valve. I did not want to just plug the hole in the head. Somewhere along the way of restoring this engine, Tom Schoolcraft’s name was given to me as having an engine similar to mine. Maybe Mr. Schoolcraft would have an extra valve that I could purchase. A call to him revealed that, yes, he did have an engine like mine, but he did not have an extra valve. After explaining to Tom that I teach woodworking and metal-working, and that our metal shop had a foundry we use for casting aluminum and brass, Tom was generous enough to lend me the valve from his engine. I used the valve for a pattern and cast my own valve. After drilling and machining the new valve I now had my own valve that looks and functions just like an original (see picture number 5 in the Image Gallery).
The picture shows my valve on the left and the original on the right. My valve still has the downsprue and gate attached to it. The picture shows how the molten brass was poured through the foundry sand to make my valve.
The only thing left to do was the pinstriping. At first I thought about taking the engine to a professional pinstriper, but after thinking about it a little while, I decided to do the pinstriping myself. This was a big decision because, you see, I had never done any pinstriping before. I purchased a little pinstriping tool, that rolls out the paint, and with that, a straight edge and lots of patience and time I did the pinstriping. I did some research and tried to match exactly how the striping would have been done when the engine left the factory back in 1922. Now, the engine is complete, but I still had not tried to start it.
One last thing to do before starting it. I needed a way to move it around, so I built the cart that you see in the finished picture. I got a set of wheels, and just made up the rest of the cart from plans I had thought up in my head, using some nice kiln-dried oak. I think the cart is both pleasing to look at and very functional.
It’s now January 1996, almost nine months since I acquired my one lunger gas engine. I’m finally ready to try to start the engine. By now so much time and work had gone into the engine that I had some strange feelings about starting it. What if it wouldn’t run right after all this effort? I had never restored a one lunger before. Could I have done something wrong and messed up the whole engine when we tried to start it? These were the thoughts going through my head. So a couple of weeks went by where I just sort of admired it.
Then one day I just decided that after school Jim and I would try to start it. I had already decided that I would only run this engine on gas. I put some gas in the fuel tank and filled the reservoir in the mixer. We oiled every moving part and turned the engine over slowly, seeing if the fuel pump was working it was. I put some fuel in the primer cup and primed the engine. With Jim choking the engine I brought the engine up on compression and spun the wheels over nothing! Again I brought the engine up on compression and spun it over, nothing again! For the third time I brought the engine up on compression and spun it over, pow, bang, and a big cloud of smoke erupted. The engine fired a few times and died out. Again I spun the flywheels and the engine fired right off, this time it stayed running. We let it run for about ten minutes that first starting. I shut the engine off and checked for bearing heat. The right side was hot, so I loosened the bolts on the bearing cap a quarter of a turn.
We started it up again and let it run for about an hour that first evening. It seemed to run good. The engine is throttle governed, and fires every fourth cycle, but after it warms up it sort of acts like a hit and miss engine, only firing enough to keep the flywheels at a constant speed. Over the next couple of weeks I fine-tuned the engine, playing with the timing and fuel mixture. So far the engine has about three or four hours of running time. It runs and seems to function perfectly.
The restoration of my one lunge’ taught me many things. I gained knowledge about our country’s history and heritage. I am now able to show my students an engine that you can actually see run, and point out the moving parts in motion. I gained a lot more from this restoration than just a nice engine. Finally, and most importantly, I was lucky enough to have friends and make new friends who were generous enough to help me in the completion of this ‘one lunger’ gas engine.


